
Ali is a Canada-based roofer who has spent around five years working hands-on in roofing, from servicing to installs. He started this site to share what he has picked up on the job in plain, practical guides. Each article is written to be clear, useful, and grounded in real roofing work rather than theory.
Roofing Z flashing is a bent metal strip shaped like the letter Z that carries water over a horizontal joint and drips it clear of the surface below. You’ll find it above windows and doors, between stacked sheets of panel siding, at roof-to-wall transitions, over horizontal trim boards, and anywhere two materials meet in a line that would otherwise trap moisture. The top leg tucks under the upper material, the middle web bridges the gap, and the bottom leg laps over the face of the lower material so runoff sheds outward instead of soaking into the seam.
If you only remember one thing, remember this: Z flashing works by gravity and overlap, not by sealant. Fasten the top leg, let the bottom leg hang free over the surface below, and never drive nails through the drip edge. Do that, keep 2 to 4 inches of end overlap between pieces, and the joint stays dry through wind-driven rain and snowmelt.
This guide covers what the part is, where it goes, how to install it step by step, which metals last longest, what it costs, and how to stop the leaks that show up when it’s done wrong. There are spec tables for sizes, materials, and expected lifespan so you can spec the right piece the first time.
What Is Z Flashing and Where Is It Used on Roofs?
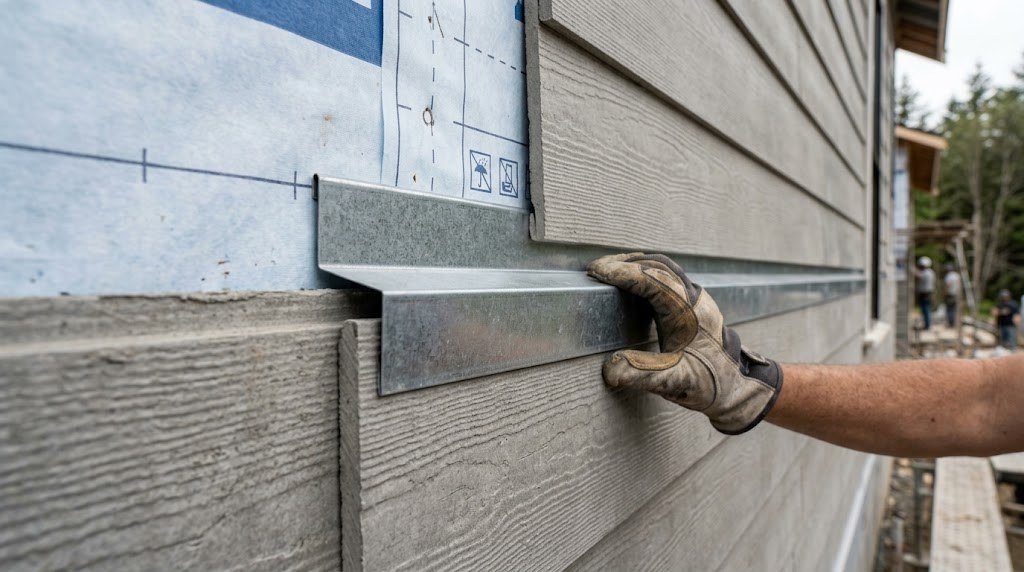
Z flashing is a three-plane piece of sheet metal folded into two right-angle bends. Seen from the end, the cross section traces a Z: a horizontal top flange, a vertical web (also called the leg or riser), and a horizontal bottom flange pointing the opposite way. Water hits the upper surface, runs down over the vertical face, and jumps off the bottom flange instead of wicking back into the joint.
On a roof and the walls that tie into it, the piece shows up in a handful of predictable spots:
- Above horizontal siding seams, especially where 4×8 sheets of T1-11 or LP panel siding stack and leave an exposed edge.
- Over the head trim of windows and doors, sending rain past the top casing.
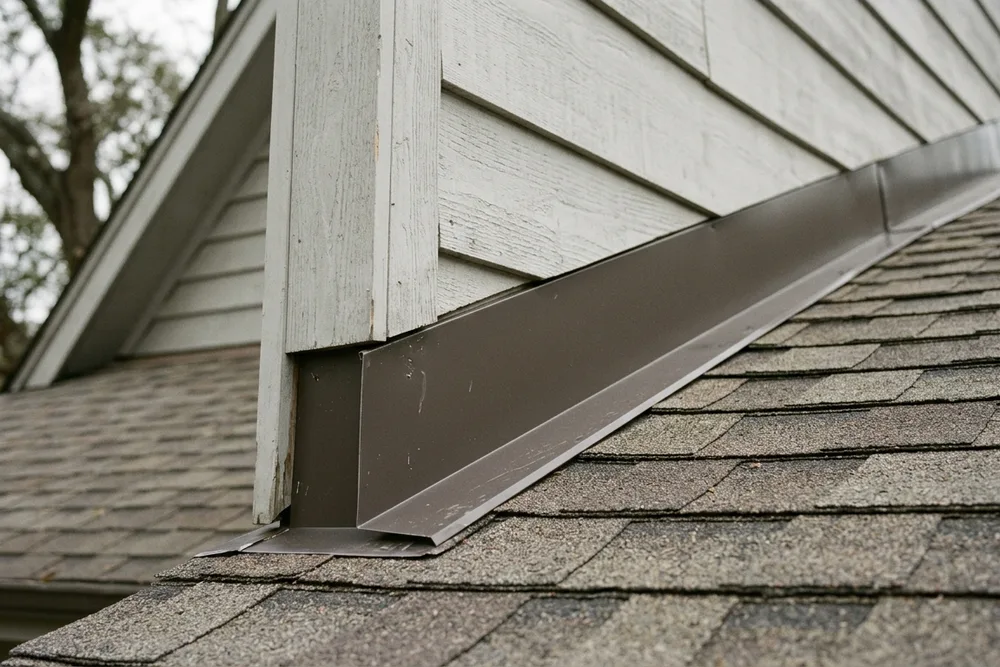
- At the base of a wall where it meets a lower roof (a roof-to-wall or headwall transition), often paired with step flashing further up the slope.
- Above horizontal trim boards, water tables, and belly bands on siding.
- Between dissimilar cladding, for example where board siding meets brick or where panel siding meets a skirt of stone.
- On metal roofing at panel transitions and at the top of a wall panel run, sometimes called Z closure or Z channel in that setting.
The reason the profile matters is simple. Any horizontal line on a vertical or sloped surface is a shelf for water. Without a metal cap that overhangs the lower piece, rain drives straight into the end grain of plywood siding or the top edge of a trim board. That’s where rot starts. Z flashing turns that shelf into a drip line.
Two quick definitions people mix up:
- Z flashing (Z bar, Z channel): folds twice, caps a horizontal joint, drips water outward. Used mid-wall and at transitions.
- Drip edge flashing: an L or T shaped profile that runs along the eaves and rakes of a roof, guiding water off the deck and into the gutter. Different job, different location.
They can appear on the same building within a few feet of each other, which is why they get confused.
What Is Z Bar Flashing? Names, Profile, and Sizing
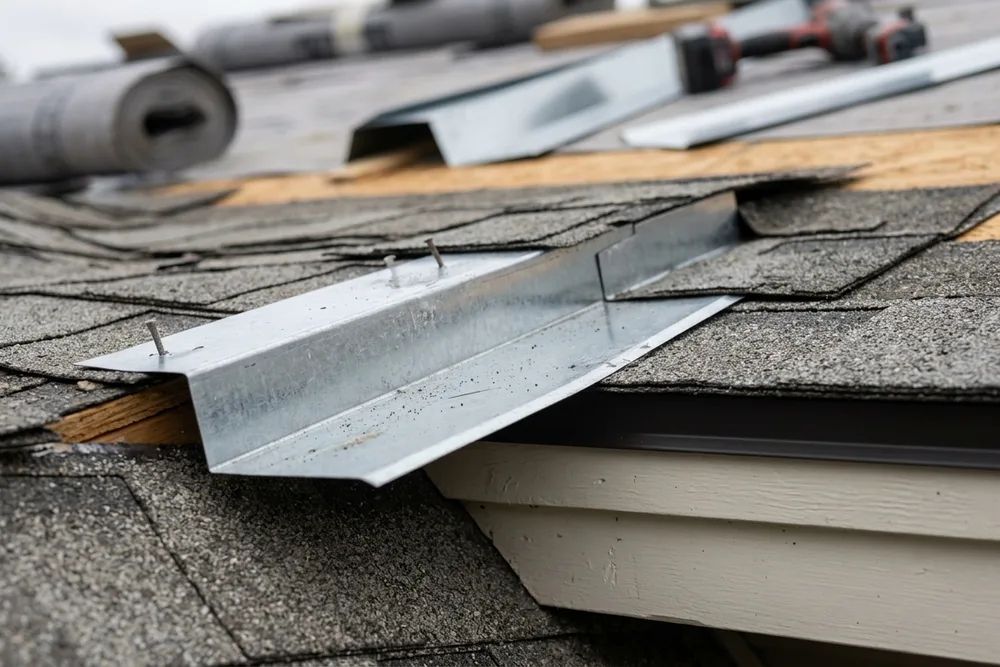
“Z bar flashing” is the same part as Z flashing. The name comes from the metal trade, where a long straight profile is called a bar. You’ll also hear Z channel flashing, Z molding, Z trim, and reveal flashing depending on the region and the supplier. In metal roofing catalogs the standing-seam version is often listed as Z closure flashing. All of them describe a strip bent into that same Z cross section.
The profile has three measurements that decide whether it fits your joint:
- Top flange width: how far the metal reaches under the upper material. More coverage means better water shedding and more surface to nail. Common range is 3/4 inch to 2 inches.
- Vertical leg height (the reveal): the face you see between the two materials. This sets the gap the flashing can bridge. Common reveals run from 3/8 inch to 1 inch.
- Bottom flange width: how far the drip leg laps over the lower material. Usually 1/2 inch to 1 inch. A wider bottom leg throws water farther from the seam.
A typical off-the-shelf piece for panel siding might read something like 3/4 inch top, 1/2 inch leg, 3/4 inch bottom, in a 10 foot length. Custom shops bend to whatever numbers your detail needs, which matters when your siding gap isn’t standard or when the design calls for a deep reveal for looks.
Here’s a quick way to picture it while you’re standing at the wall. The top flange hides. The vertical leg shows. The bottom flange sheds. If any one of those three isn’t doing its job, the joint leaks.
Why Use Z Flashing? The Case for the Part
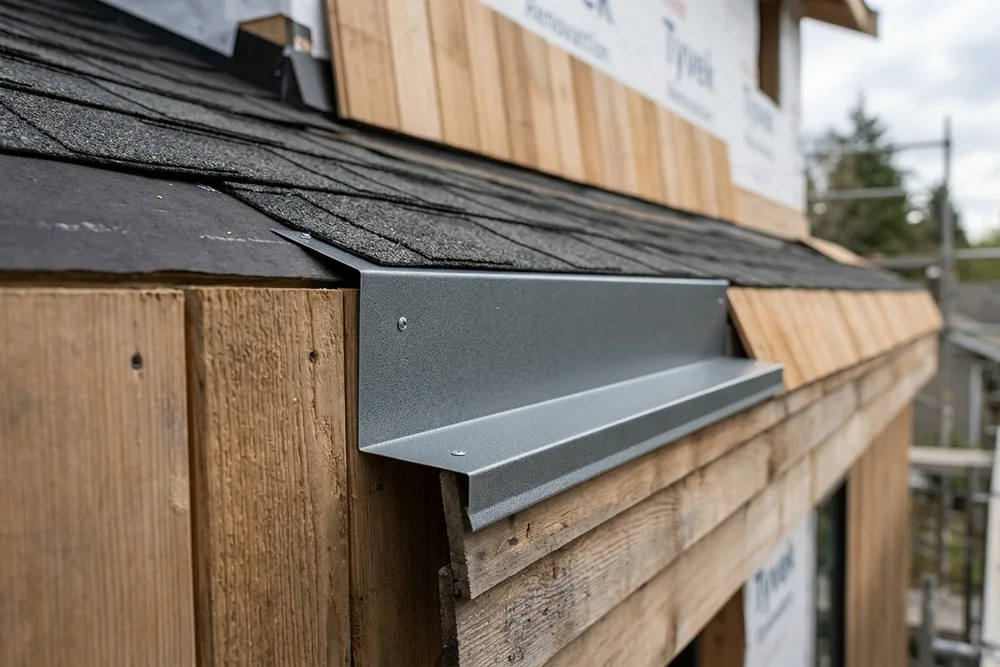
The short version: Z flashing keeps water out of horizontal joints that would otherwise rot, stain, or delaminate. Caulk alone can’t do that job for long, because sealant is a maintenance item that shrinks, cracks, and lets go, usually within 5 to 10 years. Metal that overlaps by gravity keeps working long after any bead of sealant has failed.
The longer version breaks into four concrete benefits.
First, it protects end grain and edges. Panel siding like T1-11 soaks water through its cut top edge faster than through its face. A cap flashing over that edge is the difference between siding that lasts 30 years and siding that swells and blisters in 5.
Second, it manages the meeting of two materials that move at different rates. Wood siding, fiber cement, brick, and metal all expand and contract by different amounts across a season. A rigid caulk joint between them is guaranteed to crack. A Z profile lets each material move behind and under the metal while the water still sheds.
Third, it passes code and inspection. Many building codes and manufacturer warranties require flashing at horizontal panel joints and at roof-to-wall transitions. Skip it and you risk a failed inspection or a voided siding warranty. Panel siding makers such as those producing engineered wood and plywood siding specify Z flashing at horizontal butt joints in their published installation instructions.
Fourth, it’s cheap insurance. A stick of galvanized Z flashing costs a few dollars per linear length. Tearing out rotten sheathing and replacing framing after a hidden leak costs hundreds or thousands. The math almost never favors leaving it out.
There’s an appearance argument too. A clean metal reveal between siding courses reads as intentional and tidy, and you can order it in a painted finish that matches or contrasts the wall.
Roofing Z Flashing Materials Compared
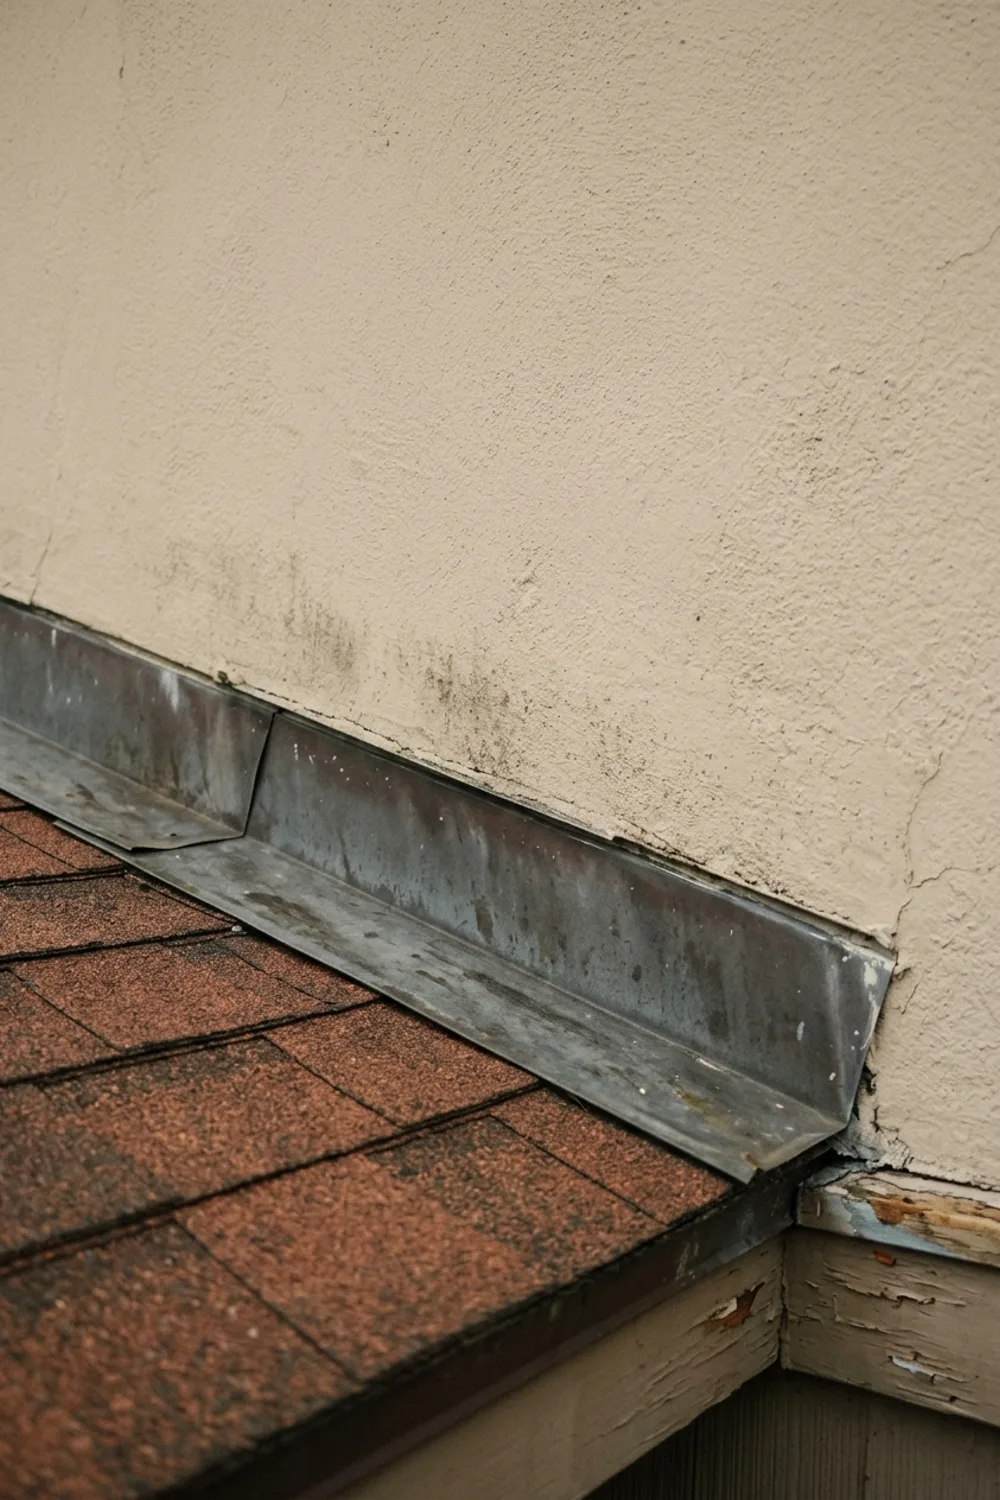
Metal choice drives cost, lifespan, and how the piece behaves next to your other materials. The wrong pairing (bare steel touching copper, or aluminum against pressure-treated lumber) sets up galvanic corrosion that eats the flashing from the inside. Match the metal to the climate, the budget, and the surrounding materials.
The table below sets the common options side by side. Prices are rough retail ranges for a standard 10 foot stick and move with the metals market, so treat them as a starting point and confirm current numbers with your supplier.
| Material | Typical thickness / gauge | Corrosion resistance | Best for | Rough cost per 10 ft |
|---|---|---|---|---|
| Galvanized steel | 26 to 24 gauge | Good (G90 coating) | General siding and trim, budget jobs | $8 to $18 |
| Painted steel (PVDF/Kynar) | 26 to 24 gauge | Good, plus color hold | Matching finished walls, metal roofs | $12 to $28 |
| Aluminum | 0.019 to 0.032 inch | Very good, won’t rust | Coastal areas, DIY, light weight | $9 to $22 |
| Copper | 16 oz (0.0216 inch) | Excellent, ages to patina | Premium, historic, long-life details | $40 to $95 |
| Stainless steel | 26 to 24 gauge | Excellent | Harsh coastal, high-value roofs | $35 to $80 |
| Plastic / PVC (vinyl) | Rigid extrusion | Immune to rust | T1-11 and panel siding, low cost | $6 to $14 |
A few notes that don’t fit in a cell:
- Plastic Z flashing (rigid PVC) is popular for panel siding because it never rusts, cuts with a utility knife, and comes in white, brown, and black to blend with trim. It’s less rigid than metal and can get brittle in extreme cold, so it’s best on protected vertical joints rather than exposed roof edges.
- Copper Z flashing is the long-life choice. It outlasts most roofs, solders into watertight seams, and turns a green-brown patina over time. The trade-off is price and the need to keep it away from bare aluminum and galvanized steel to avoid galvanic reaction.
- Black Z flashing usually means a factory-painted steel or aluminum in a dark finish, chosen to disappear into shadow lines and dark siding. The color is a coating, not a different metal, so match the base metal to the climate as usual.
- Galvanized is the workhorse. For most homes on most walls, 24 gauge G90 galvanized (painted if it shows) is the sensible default.
Sizes, Gauges, and Specs at a Glance
Picking a gauge is a balance. Thinner metal costs less and bends easily but oil-cans (ripples) on long runs and dents under a ladder. Thicker metal holds its line and shrugs off abuse but costs more and is stiffer to work by hand. For flashing that mostly sits still and sheds water, you don’t need heavy plate, but you don’t want foil either.
The table pairs common applications with sensible sizes so you can spec quickly.
| Application | Suggested material / gauge | Top flange | Vertical leg | Bottom flange | Overlap at seams |
|---|---|---|---|---|---|
| T1-11 / panel siding horizontal joint | 24 ga galvanized or rigid PVC | 3/4 to 1 in | 3/8 to 1/2 in | 3/4 in | 2 to 3 in |
| Window / door head | 24 ga painted steel or aluminum | 1 to 1.5 in | 1/2 in | 3/4 in | full-width end dams |
| Roof-to-wall (headwall) | 26 to 24 ga painted steel | 4 in up wall | per detail | 4 in onto roof | 3 to 4 in, sealed laps |
| Metal roof Z closure | 24 ga matching panel | per panel | panel height | 1 in | 2 to 4 in, butyl taped |
| Trim board / water table | 24 ga or PVC | 3/4 in | 1/2 in | 3/4 in | 2 in |
| Deck ledger cap | 24 ga stainless or copper | 3 in min | 1/2 in | 1.5 in | 3 in, sealed |
Two rules of thumb ride along with this table. On any horizontal joint that faces weather, aim for a bottom flange that overhangs the lower surface by at least 1/2 inch so the drip line clears the seam. And on roof-to-wall work, the vertical leg that runs up the wall should reach at least 4 inches, then get covered by the wall’s water-resistive barrier and cladding so water sheds onto the metal, never behind it.
How Do You Install Z Flashing Correctly, Step by Step
Correct installation is mostly about layering and fastening. Water always wins if the flashing sits under the material it’s supposed to protect, or if a nail punches through the drip path. Here’s the sequence that works for a horizontal panel-siding joint, which is the most common home application.
Step 1: Confirm the joint and the water barrier. The house wrap or building paper behind the siding should already lap correctly, upper sheet over lower, like shingles. If it doesn’t, fix it first. The Z flashing supplements that barrier; it doesn’t replace it.
Step 2: Cut the flashing to length plus overlap. Measure the run, then add 2 to 3 inches for each end lap where two sticks meet. Cut metal with snips or a shear, not a grinder that burns the coating. Cut rigid PVC with a fine-tooth blade or a sharp knife.
Step 3: Set the lower panel and slip the flashing over its top edge. The bottom flange of the Z should lap over the face of the lower siding sheet. Push the vertical leg down snug against that top edge. The top flange now points up and back toward the wall, ready to disappear behind the upper sheet.
Step 4: Fasten the top flange only. Drive corrosion-resistant nails or screws through the top flange into the framing or sheathing, spaced about 16 inches. This is the one place you fasten. Never nail through the vertical leg or the bottom drip flange, because every hole there is a leak waiting for the first hard rain.
Step 5: Leave a small gap, don’t jam the panels tight. Hold roughly 1/8 to 1/4 inch of space between the top of the lower panel and the bottom of the upper panel behind the flashing. That gap lets water that gets behind the siding drain out over the flashing instead of pooling.
Step 6: Set the upper panel over the top flange. The upper sheet’s bottom edge covers the top flange completely. Fasten the upper panel per its own schedule, keeping fasteners high enough that they land in the sheathing above the flashing, not through it.
Step 7: Handle the end laps. Where two pieces of flashing meet on a long wall, lap the upstream piece over the downstream piece by 2 to 3 inches so water flows across the joint, not into it. A dab of compatible sealant inside the lap adds insurance, but the overlap does the real work.
Step 8: Detail the ends and corners. At an outside corner, wrap or miter the flashing so the drip continues around. At a window head, add end dams (small upturned tabs) so water can’t run off the ends into the wall.
The same logic scales up to a roof-to-wall transition, with two differences. The vertical leg runs higher up the wall and gets covered by the wall’s weather barrier and siding. And the bottom flange laps onto the roofing over the underlayment, usually working together with step flashing on the sloped sides. On metal roofs, the Z closure gets set with butyl sealant tape and matching screws with gaskets, and it pairs with foam closure strips to block the ribs.
Best materials for the job, quickly: 24 gauge painted steel for finished walls that show, aluminum for coastal or DIY work where rust worries you, copper for premium long-life details, and rigid PVC for hidden panel-siding joints on a budget. Whatever you pick, keep the fasteners the same family as the flashing (stainless or hot-dip galvanized) so the nails don’t rust and streak the wall.
Drip Edge Flashing and How It Differs From Z Flashing
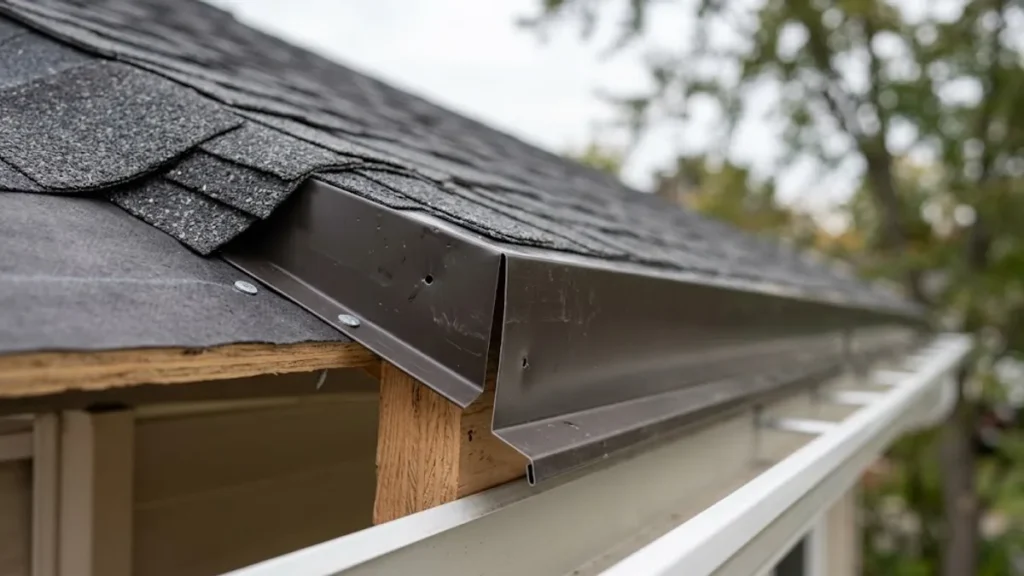
Drip edge flashing gets grouped with Z flashing because both drip water, but they live in different places and solve different problems. Drip edge is the metal strip that runs along the eave and rake edges of the roof, tucked under the underlayment at the rakes and over it at the eaves, so water leaving the shingles drops into the gutter instead of curling back under the deck. Most current residential codes require it at roof edges.
Where the two overlap in practice is at a roof-to-wall meeting or a lower-roof-to-upper-wall junction, where you might run drip edge along the roof edge and Z or apron flashing at the wall base within inches of each other. Getting the drip edge flashing install right matters because a sloppy eave detail sends water behind the fascia, which then finds the wall flashing from the wrong side.
Quick contrast so the two never get mixed on a plan set:
| Feature | Z flashing | Drip edge flashing |
|---|---|---|
| Shape | Z (two bends, three planes) | L or T profile |
| Location | Horizontal wall joints, transitions | Roof eaves and rakes |
| Main job | Cap a horizontal seam, shed water out | Guide roof runoff into the gutter |
| Typical metal | Galvanized, aluminum, copper, PVC | Aluminum, galvanized, painted steel |
| Code status | Required by many siding makers | Required at roof edges by most codes |
If you’re ordering both for one job, spec them separately by profile and length. They rarely substitute for each other.
Why Use RDP Z Flashing? Roll-Formed, Made-to-Spec Profiles
“RDP Z flashing” refers to Z flashing supplied as a manufacturer’s roll-formed product line rather than a piece bent by hand on the job site. The exact specs and finishes belong to that supplier’s catalog, so confirm the numbers with them before ordering, but the reason to choose factory roll-formed flashing over hand-bent metal is worth spelling out, because it holds for any brand.
Roll-formed flashing is pulled through a series of shaped rollers, which produces a consistent, dead-straight profile piece after piece. Hand brakes, by contrast, leave slight variation in leg height and angle across a run, and any wobble in the vertical leg shows as a wavy reveal line on a finished wall. For a joint that shows, that consistency reads as quality.
The practical advantages of ordering roll-formed, made-to-spec Z flashing:
- Tighter tolerances. Leg heights and bend angles stay uniform, so long runs look clean and pieces nest for overlap.
- Factory finishes. You get baked-on PVDF or polyester coatings in matched colors, including black and bronze, that resist fade far better than field-applied paint.
- Correct alloy and gauge. A dedicated shop keeps the right metals in stock and won’t hand you underspec material.
- Long, continuous lengths. Roll forming can run pieces longer than a standard brake, cutting the number of end laps on a long wall.
- Custom bends. Non-standard reveals, deeper drips, or hemmed edges (folded safe edges) get formed to your drawing.
For a small repair on a hidden joint, a hand-bent stick of galvanized is fine. For a visible reveal, a whole-house re-side, or a metal roof where the closures must match the panel, a roll-formed line pays for itself in appearance and fit. Compare a supplier’s RDP or roll-formed offering against a builder-grade off-the-shelf stick on three points: finish quality, available lengths, and whether they’ll bend a custom profile to your detail.
Products Custom Made to Order
Most flashing sold at a home center comes in a few fixed profiles and lengths. That’s fine for standard details. It falls short the moment your joint isn’t standard: an unusual siding gap, a deep architectural reveal, a color that has to match existing trim, or a transition between two materials with odd thicknesses. That’s where custom, made-to-order flashing earns its place.
Sheet metal shops and specialty flashing suppliers bend to your dimensions. To order a custom piece, you give them a simple cross-section sketch with three numbers (top flange, leg height, bottom flange), the bend directions, the metal and gauge, the finish or color, and the total length needed. Many shops accept a photo of the joint with measurements written on it. Turnaround is often a day or two for common metals, longer for copper or special colors.
When custom-made Z flashing makes sense:
- The reveal has to match an existing line on the building for a clean repair.
- You need a hemmed (folded) drip edge for a crisp shadow and a safer edge.
- The color must match a specific siding or roof panel, not just “brown” or “white.”
- The joint bridges an unusual gap that no stock profile covers.
- You want longer continuous lengths to reduce end laps on a long elevation.
A tip that saves reorders: make a short cardboard or scrap-metal template of the exact bend you want and bring it in, or bend one test piece and check it on the wall before committing to a full production run. It’s far cheaper to catch a wrong leg height on one sample than on 200 feet of finished metal.
Roofing Z Flashing Price: What to Budget
Price depends on metal, gauge, profile size, finish, and whether the piece is stock or custom. Copper and stainless cost several times what galvanized does. A painted finish adds a few dollars over bare. Custom bends carry a setup and per-foot charge on top of material.
As a planning guide, here’s how the costs stack up per linear length, plus the labor and extras that go with a real job.
| Cost item | Typical range | Notes |
|---|---|---|
| Galvanized Z flashing, stock 10 ft | $8 to $18 | Cheapest metal option |
| Aluminum Z flashing, stock 10 ft | $9 to $22 | Won’t rust, good for coast |
| PVC / plastic Z flashing, 10 ft | $6 to $14 | Panel siding, hidden joints |
| Copper Z flashing, 10 ft | $40 to $95 | Premium, decades of life |
| Custom bend surcharge | $1 to $4 per ft | On top of material |
| Painted / PVDF finish | +$3 to $8 per stick | Color match, fade resistance |
| Compatible fasteners | $8 to $20 per box | Stainless or hot-dip galvanized |
| Sealant / butyl tape | $6 to $14 per tube/roll | For laps and metal-roof closures |
| Pro labor (install) | $2 to $6 per linear ft | Varies by height and access |
For a single horizontal joint repair on a one-story wall, a homeowner might spend $20 to $60 in materials. Re-flashing a full elevation during a re-side runs into the low hundreds in metal plus labor. On a metal roof, the Z closures and matching gasketed screws add up faster because the details are fussier and the color match is not optional. Prices move with the metals market and vary by region, so get a current quote before you budget tightly.
What Problems Occur With Z Flashing, and How to Prevent Leaks
Most Z flashing leaks trace back to a handful of avoidable mistakes. The metal itself rarely fails first. Installation and detailing do. Here’s the troubleshooting map.
| Problem | Likely cause | Prevention / fix |
|---|---|---|
| Water behind siding at the joint | Bottom flange laps under, not over, lower panel | Reset so bottom flange covers the face of the lower piece |
| Rust streaks on the wall | Wrong fasteners, or bare steel scratched | Use stainless / hot-dip nails, touch up cuts |
| Leak at end lap | Pieces butted, not overlapped | Lap upstream over downstream 2 to 3 in, seal inside |
| Drip line hitting the seam | Bottom flange too short, no overhang | Choose a wider bottom flange, 1/2 in overhang min |
| Water into wall at window ends | No end dams on head flashing | Add upturned end dams at both ends |
| Nail holes leaking | Fasteners driven through leg or drip | Fasten top flange only, never the drip face |
| Galvanic corrosion pitting | Dissimilar metals touching | Separate copper from aluminum/steel, match fasteners |
| Oil-canning (wavy metal) | Gauge too thin on a long run | Step up one gauge, or use roll-formed pieces |
| Sealant cracked and leaking | Relied on caulk instead of overlap | Re-detail so gravity and overlap shed water |
| Ice backing up under flashing | No underlayment / ice barrier below | Add ice-and-water membrane at cold-climate transitions |
The single most common failure is reversing the lap: setting the flashing so the upper material sits over the top flange (correct) but letting the bottom flange tuck behind the lower material instead of over its face. When that happens, the flashing funnels water into the joint it was meant to protect. Always check that the bottom leg is on the outside of the lower surface.
The second most common failure is fastening in the wrong place. Nails belong in the top flange, high and hidden. Every nail in the vertical leg or the drip flange is a direct path for water. If you inherit a wall where someone face-nailed the drip, pull those nails, seal the holes, and refasten up top.
A prevention checklist you can run before you close up a wall:
- Bottom flange laps over the lower material, with a visible drip overhang.
- Top flange is fully covered by the upper material.
- Fasteners are in the top flange only.
- End laps run upstream over downstream, 2 inches or more.
- Window and door heads have end dams.
- Fasteners and flashing are the same metal family.
- In cold climates, ice-and-water membrane sits under transition flashing.
Run that list and you eliminate the large majority of leaks before they start.
How Long Does Z Flashing Last, and Does Climate Affect Its Lifespan?
Lifespan is mostly a metal question, then a climate question. In a mild inland climate, quality flashing routinely outlives the siding or roof around it. In a salty coastal or heavy-industrial setting, the same piece can corrode years sooner. The finish matters too: a painted or coated surface protects the base metal and slows the clock.
The table gives realistic service-life ranges by material and setting. These assume correct installation, because a well-made metal piece installed backward can fail in a single wet season regardless of the alloy.
| Material | Mild inland climate | Coastal / salt air | Heavy freeze-thaw |
|---|---|---|---|
| Galvanized steel (G90) | 20 to 40 years | 8 to 15 years | 15 to 30 years |
| Painted / PVDF steel | 30 to 45 years | 15 to 25 years | 25 to 40 years |
| Aluminum | 30 to 50 years | 25 to 40 years | 30 to 45 years |
| Copper | 60 to 100+ years | 50 to 80 years | 60 to 100 years |
| Stainless steel | 50 to 100 years | 40 to 80 years | 50 to 90 years |
| PVC / plastic | 20 to 30 years | 20 to 30 years | 10 to 20 years (can embrittle) |
Climate drives the choices you should make:
- Coastal and salt air: aluminum, stainless, or copper. Salt eats galvanized steel fast, so avoid it near the ocean or use it only well inland from the shore.
- Hot, high-UV regions: any metal is fine, but factory PVDF finishes hold color where field paint chalks and fades. Dark colors run hotter, which matters more for expansion than for corrosion.
- Cold, freeze-thaw climates: metal handles temperature swings better than rigid PVC, which can grow brittle and crack in deep cold. Add an ice-and-water membrane under transition flashing so ice dams can’t push water behind the metal.
- Wet, humid, mossy climates: keep dissimilar metals apart, since constant moisture accelerates galvanic corrosion, and choose coatings that resist algae staining.
One practical takeaway: the flashing should be at least as durable as the assembly it protects. Putting 8-year coastal-life galvanized behind 40-year siding guarantees a tear-out down the road. Match the lifespans, or over-spec the flashing, because it’s the cheap part of the wall and the expensive part to replace once it’s buried.
Do You Need Closure Strips and Proper Overlaps for Wind Resistance?
On metal roofing and open panel transitions, yes. Closure strips (foam or metal pieces shaped to fill the ribs of a metal panel) block the gaps that a flat Z closure can’t seal on its own, and correct overlaps keep wind-driven rain from being pushed uphill into the joint. Skip either one and a stiff storm will drive water where gravity alone wouldn’t.
Here’s how the pieces work together on a metal roof-to-wall or panel transition:
- The Z closure caps the transition and directs water.
- Foam closure strips fill the corrugations under the flashing so wind can’t blow rain through the rib openings.
- Butyl sealant tape seals the flat contact areas between the closure and the panel.
- Gasketed screws fasten without leaving open holes.
Overlap rules for wind resistance:
- End-lap flashing pieces 2 to 4 inches, upstream over downstream, and seal inside the lap with butyl.
- On low-slope metal roofs, increase the lap and the sealant, since water moves slower and sits longer.
- In high-wind or hurricane zones, tighten fastener spacing and follow the panel maker’s wind-rated detail, which often calls for both closures and continuous sealant.
- Keep the vertical leg tall enough at wall transitions that wind can’t drive water over the top of it.
For ordinary siding joints on a protected wall, foam closures aren’t part of the picture; the overlap and the drip do the work. But any time the flashing sits at an exposed roof plane, a panel transition, or an eave in a windy area, closures and generous sealed overlaps move from optional to necessary. They’re a few dollars of foam and tape that decide whether the detail survives a storm.
Ordering, Support, and Getting the Right Piece
Buying flashing well comes down to giving the supplier the right information and using their help. Whether you order from a local sheet metal shop, a roofing distributor, or a specialty flashing company, the process is the same and the support they offer is worth using.
What to have ready when you order:
- A cross-section sketch with the three key numbers (top, leg, bottom) and bend directions.
- The metal and gauge, or a description of the climate and surrounding materials so they can recommend one.
- The finish or exact color, ideally a sample chip or a photo of the material you’re matching.
- Total linear length, plus 5 to 10 percent for waste, cuts, and end laps.
- A photo of the joint. Good suppliers will spot a detail problem from a picture before you buy the wrong profile.
Most suppliers keep a support line or counter staff who do this every day. Lean on them. Ask which profile they’d use for your exact joint, whether they stock it or bend it to order, and what lead time to expect. If you’re setting up a trade or company account, ask about bulk pricing on full-house quantities and whether they’ll hold a custom bend profile on file for reorders, which speeds up future repairs to match. Keep your order details (profile, metal, color code, lengths) in your own account records or a project folder so the next piece matches the first without guesswork.
A short buying checklist:
- Sketch the profile with three dimensions.
- Pick metal and finish for the climate and the look.
- Confirm stock vs custom and the lead time.
- Order length plus 10 percent.
- Buy matching fasteners and sealant at the same time.
- Save the spec for future matching repairs.
Good support at the point of sale prevents most of the reorders and mismatches that slow a job down. It costs nothing to ask, and the person behind the counter has usually seen your exact detail a hundred times.
Putting It Together: A Quick Reference
Bring the whole guide down to a few lines you can act on:
- Z flashing caps horizontal joints and drips water clear. Top flange hides, leg shows, bottom flange sheds.
- Fasten the top flange only. Never nail the leg or the drip.
- Lap end joints 2 to 4 inches, upstream over downstream.
- Match the metal to the climate: galvanized inland, aluminum or stainless on the coast, copper for long life, PVC for hidden budget joints.
- Give the bottom flange at least a 1/2 inch overhang so the drip clears the seam.
- On metal roofs and exposed transitions, add closure strips, butyl tape, and gasketed screws.
- Spec flashing at least as durable as the wall or roof it protects.
Get those right and the joint stays dry for the life of the assembly. Most Z flashing failures are installation and detailing problems, not material problems, which means careful work with an ordinary galvanized or aluminum piece beats sloppy work with copper every time.
FAQ
What is Z flashing used for on a roof or wall?
Z flashing caps a horizontal joint and sheds water outward so it can’t soak into the seam. On homes it most often protects the top edge of panel siding like T1-11, the head of windows and doors, and roof-to-wall transitions. The Z shape lets the top edge hide under the upper material while the bottom edge drips clear of the lower material.
How do you install Z flashing so it doesn’t leak?
Set the bottom flange over the face of the lower material, push the vertical leg down against the top edge, then fasten only the top flange (never the leg or the drip). Cover the top flange with the upper material, lap end joints 2 to 4 inches upstream over downstream, and add end dams at window and door heads. The two mistakes that cause most leaks are reversing that bottom lap and nailing through the drip.
What is the best material for Z flashing?
For most inland homes, 24 gauge galvanized steel (painted if it shows) is the sensible default. Choose aluminum or stainless near the coast where salt attacks galvanized, copper for premium long-life details, and rigid PVC for hidden panel-siding joints on a budget. Always match your fasteners to the flashing metal so they don’t corrode and streak the wall.
How much does Z flashing cost?
A stock 10 foot stick runs roughly $6 to $22 for PVC, galvanized, or aluminum, and $40 to $95 for copper. Custom bends add about $1 to $4 per foot, and a painted PVDF finish adds a few dollars per stick. A single joint repair might cost $20 to $60 in materials, while re-flashing a full wall runs into the low hundreds plus labor. Prices track the metals market, so get a current quote.
How long does Z flashing last?
Galvanized steel lasts about 20 to 40 years inland but only 8 to 15 years in salt air. Aluminum reaches 30 to 50 years, copper and stainless can pass 50 to 100 years, and PVC runs 20 to 30 years but can embrittle in deep cold. Correct installation matters as much as the metal, since a piece installed backward can fail in one wet season regardless of the alloy.
Do I need closure strips and overlaps for wind resistance?
On metal roofs and exposed panel transitions, yes. Foam closure strips fill the panel ribs, butyl sealant tape seals the flat contacts, and gasketed screws fasten without open holes, while 2 to 4 inch sealed overlaps stop wind-driven rain from being pushed into the joint. On protected siding joints, closures aren’t needed and the overlap plus the drip do the work.
What’s the difference between Z flashing and drip edge flashing?
They drip water but do different jobs. Z flashing has two bends and caps horizontal wall joints and transitions. Drip edge is an L or T profile that runs along roof eaves and rakes to guide runoff into the gutter and is required at roof edges by most codes. You may see both within a few feet of each other at a roof-to-wall meeting, so order them separately by profile.
Pingback: Steel Roof Underlayment: A Practical Guide – throneroofing.online
Pingback: Roofing For Low Slope Roof: A Practical Guide – throneroofing.online
Pingback: Roof Drip Edge Flashing: A Practical Guide - throneroofing.online